")
参考资料:https://blog.csdn.net/jcdjx/article/details/38457271
以下为转载内容
用树莓派实现RGB LED的颜色控制 RGB色彩模式是工业界的一种颜色标准,是通过对红(R)、绿(G)、蓝(B)三个颜色通道的变化以及它们相互之间的叠加来得到各式各样的颜色的,RGB即是代 表红、绿、蓝三个通道的颜色,这个标准几乎包括了人类视力所能感知的所有颜色,是目前运用最广的颜色系统之一。RGB色彩模式使用RGB模型为图像中每一个像素的RGB分量分配一个0~255范围内的强度值。RGB图像只使用三种颜色,就可以使它们按照不同的比例混合,从而得到各种各样的颜色。 在实际的控制中,往往通过PWM来实现LED亮度(颜色深度)的控制。 树莓派只有一路硬件PWM输出(GPIO1),可是要实现RGB LED的控制,需要3路PWM。其实,wiringPi库为我们提供了用软件多线程实现的PWM输出,我们可以利用这个库提供的函数很方便的将任意GPIO配置为PWM输出。在本例中,我将GPIO0,GPIO1,GPIO2配置成了soft PWM输出。树莓派的引脚分配表如下图所示:

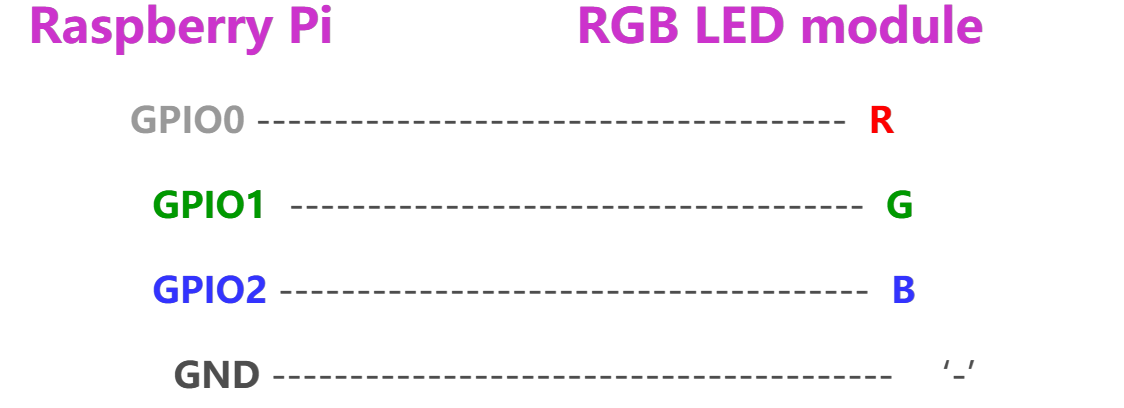
我用的RGB LED是共阴极的,与树莓派的连接方式如下:

源代码:
#include #include #include #define uchar unsigned char #define LedPinRed 0
#define LedPinGreen 1
#define LedPinBlue 2 void ledInit(void)
{ softPwmCreate(LedPinRed, 0, 100); softPwmCreate(LedPinGreen,0, 100); softPwmCreate(LedPinBlue, 0, 100);
} void ledColorSet(uchar r_val, uchar g_val, uchar b_val)
{ softPwmWrite(LedPinRed, r_val); softPwmWrite(LedPinGreen, g_val); softPwmWrite(LedPinBlue, b_val);
} int main(void)
{ int i; if(wiringPiSetup() == -1){ //when initialize wiring failed,print message to screen printf("setup wiringPi failed !"); return 1; } ledInit(); while(1){ ledColorSet(0xff,0x00,0x00); //red delay(500); ledColorSet(0x00,0xff,0x00); //green delay(500); ledColorSet(0x00,0x00,0xff); //blue delay(500); ledColorSet(0xff,0xff,0x00); //yellow delay(500); ledColorSet(0xff,0x00,0xff); //pick delay(500); ledColorSet(0xc0,0xff,0x3e); delay(500); ledColorSet(0x94,0x00,0xd3); delay(500); ledColorSet(0x76,0xee,0x00); delay(500); ledColorSet(0x00,0xc5,0xcd); delay(500); } return 0;
}
将此代码保存为rgb.c。
编译代码:
gcc rgb.c -o rgb -lwiringPi -lpthread
运行代码:
./rgb
注意:
1,-lwiringPi选项:指明了要链接到wiringpi库,因为softPwm的实现就在此库;
2,-lpthread选项:因为softPwm的实现用了Linux的多线程机制,所以加这个编译选项。
以下是改进后的代码,编译方式同上。
#include #include #include #define LedPinRed 0
#define LedPinGreen 1
#define LedPinBlue 2 int colors[] = {0xFF0000, 0x00FF00, 0x0000FF, 0xFFFF00, 0x00FFFF, 0xFF00FF, 0xFFFFFF, 0x9400D3}; /******************************************************************************************
* 将一个数从一个区间线性映射到另一个区间,比如将0~100之间的一个数映射到0~255之间
******************************************************************************************/
int map(int x, int in_min, int in_max, int out_min, int out_max) { return (x -in_min) * (out_max - out_min) / (in_max - in_min) + out_min;
} void ledInit(void)
{ softPwmCreate(LedPinRed, 0, 100); //create a soft pwm, original duty cycle is 0Hz, range is 0~100 softPwmCreate(LedPinGreen,0, 100); softPwmCreate(LedPinBlue, 0, 100);
} void ledColorSet(int color) //set color, for example: 0xde3f47
{ int r_val, g_val, b_val; r_val = (color & 0xFF0000) >> 16; //get red value g_val = (color & 0x00FF00) >> 8; //get green value b_val = (color & 0x0000FF) >> 0; //get blue value r_val = map(r_val, 0, 255, 0, 100); //change a num(0~255) to 0~100 g_val = map(g_val, 0, 255, 0, 100); b_val = map(b_val, 0, 255, 0, 100); softPwmWrite(LedPinRed, 100 - r_val); //change duty cycle softPwmWrite(LedPinGreen, 100 - g_val); softPwmWrite(LedPinBlue, 100 - b_val);
} int main(void)
{ int i; if(wiringPiSetup() == -1){ //when initialize wiringPi failed, print message to screen printf("setup wiringPi failed !\n"); return 1; } ledInit(); while(1){ for(i = 0; i < sizeof(colors)/sizeof(int); i++){ ledColorSet(colors[i]); delay(500); } } return 0;
}
python版本:https://blog.csdn.net/jcdjx/article/details/43486075
代码:
#!/usr/bin/env python
#*********************************************************
# File Name :rgb.py # Author :Jason Dai
# Date : 2015/02/04
#*********************************************************
import RPi.GPIO as GPIO
import time colors = [0xFF0000, 0x00FF00, 0x0000FF, 0xFFFF00, 0xFF00FF, 0x00FFFF, 0xFFFFFF, 0x9400D3]
pins = {'pin_R':11, 'pin_G':12, 'pin_B':13} # pins is a dict GPIO.setmode(GPIO.BOARD) # Numbers GPIOs by physical location
for i in pins: GPIO.setup(pins[i], GPIO.OUT) # Set pins' mode is output GPIO.output(pins[i], GPIO.HIGH) # Set pins to high(+3.3V) to off led p_R = GPIO.PWM(pins['pin_R'], 2000) # set Frequece to 2KHz
p_G = GPIO.PWM(pins['pin_G'], 2000)
p_B = GPIO.PWM(pins['pin_B'], 5000) p_R.start(100) # Initial duty Cycle = 100(leds off)
p_G.start(100)
p_B.start(100) def map(x, in_min, in_max, out_min, out_max): # 将一个数从一个区间线性映射到另一个区间,比如将0~100之间的一个数映射到0~255之间 return (x - in_min) * (out_max - out_min) / (in_max - in_min) + out_min def setColor(col): # For example : col = 0x112233 R_val = (col & 0xFF0000) >> 16 G_val = (col & 0x00FF00) >> 8 B_val = (col & 0x0000FF) >> 0 R_val = map(R_val, 0, 255, 0, 100) # change a num(0~255) to 0~100. G_val = map(G_val, 0, 255, 0, 100) B_val = map(B_val, 0, 255, 0, 100) p_R.ChangeDutyCycle(100 - R_val) # Change duty cycle p_G.ChangeDutyCycle(100 - G_val) p_B.ChangeDutyCycle(100 - B_val) try: while True: for col in colors: setColor(col) time.sleep(0.5)
except KeyboardInterrupt: p_R.stop() p_G.stop() p_B.stop() for i in pins: GPIO.output(pins[i], GPIO.HIGH) # Turn off all leds GPIO.cleanup()
运行程序:
python rgb.py
以上为转载内容
实际效果:

#树莓派[6] 收起

回复